


Sauerkraut Recipe & Tips
 The bounty of fresh summertime produce motivates me to prepare some tasty ferments to enjoy with friends by the water and to eat every day throughout the warm weather when lighter fare is preferred. Besides increased gut health, another benefit of making this recipe in warm weather is that you don’t need to heat up your kitchen to prepare this nourishing food. Fermented foods are considered ‘cooked without heat’. They are superior to raw foods because they have the added advantage of adding beneficial microbes to your gut, which are necessary for great overall health.
I have adapted this basic sauerkraut recipe from the Nourishing Traditions Cookbook. It can be fun to experiment and ferments are rather forgiving in that they can accommodate many ingredient and flavor variations. If this is your first time making your own sauerkraut, I suggest sticking with the basic recipe here. Once you’ve got that down, try adding some of the optional ingredients when you’re feeling adventurous!
Basic Sauerkraut Recipe
Ingredients:
- 1 organic, medium green cabbage with any damaged outer leaves trimmed or removed, as needed
- 1 TBL sea salt1 or less (I use Real Salt – see Notes for additional tips on salt)
- 1 TBL caraway seeds
Some Optional Ingredients:
- 1-2 large fresh cabbage leaves for covering the finished mixture, if desired
- 1 cup kale, chopped
- 4 TBL liquid whey (Omit this for any dairy sensitive folks. Whey is added to many ferment recipes as a precaution to encourage only beneficial flora inhabit the ferment. I typically rely on sea salt for this purpose and skip the whey.)

Notes:
- You can use Redmond’s Real Salt, Himalayan Crystal Salt, Celtic Sea Salt (click on any of these names to purchase quality salt on Amazon) or any unbleached, non-iodized sea salt (iodine is a disinfectant, so avoid regular table salt in this recipe and in your diet). I prefer Redmond’s Real Salt because besides being high in a multitude of trace minerals, it is more affordable than most other quality sea salts and is sourced from ancient sea beds in the U.S. (Utah), which is a far more sustainable purchase for me here in Oregon. I enjoy an assortment of sea salts, but do be aware that due to the variations in mineral content (amounts and types of minerals vary in different sources) some taste saltier than others, so adjust the amount you add based on this. Remember, you can always add more, but the only way to mitigate overly salty kraut is to add more cabbage and blend it all up well together to distribute the overly salty portion. [I’ll tell you how I know this…trial and error, and MANY ‘mistakes’ in the kitchen! ;-) ] You can weigh your cabbage at the store if you do not have a kitchen scale and you are purchasing your cabbage from the store. Just account for some loss from removing the core and any damaged outer leaves.
Special Equipment: (See 1st Preparation Instructions and Tips below for further information.)
- Food Processor (optional)
- Mandolin (optional)
- Large bowl or food grade bucket for mixing ingredients (optional)
- Wide mouth quart mason jar and lid (only optional if you have another viable fermentation vessel)
- Wooden kraut pounder (optional, but preferred for tightly packing your jar(s))
- Weights to hold kraut under the brine (optional)
Preparation Instructions and Tips:
- Core and chop cabbage into hunks and then thin strips. I feed the hunks through my food processor to make quick work of this. A mandolin would be preferred because of the beautifully consistent ribbons of cabbage it produces giving a finer, more delicate texture to the finished product. Using a mandolin for preparation does take longer, requires more effort, can be more dangerous, and I have personally yet to invest in a mandolin. Folks without either of these kitchen tools can cut the cabbage by hand, though I would rather avoid this option, mostly because I am lazy in the kitchen. I just want to eat REALLY awesome food, not spend too much of my life making it when there are so many other more enjoyable activities to be engaged in.
- Blend the flavors: I’ll describe 2 primary methods for accomplishing this, both of which are utilized with the purpose of evenly distributing the seasonings (especially the protective salt) throughout your batch. My preferred method is to combine the shredded cabbage with other large optional ingredients (if using) and blend together in a large bowl or food grade bucket. I prefer using my clean hands to mix the ingredients, though you can use a large wooden spoon if you prefer. After the main ingredients are fairly evenly blended, sprinkle half of the seasonings (salt, caraway seeds, and any other herbs) as evenly as possible over the surface of the vegetables. Blend these in by lifting and folding the vegetables over several times while massaging the shredded cabbage to encourage it to release as much of it’s juices as possible. Repeat this process with the second half of the herbs until well combined. Alternately, you can pound the cabbage as you are blending, using a wooden device or your own fists. I used to do this, but have found that I prefer using my hands to massage the cabbage (it’s fun to play with your food!), though for large batches, we will sometimes still use a wooden kraut pounder. I have also found that my wrists don’t enjoy pounding kraut and I prefer to keep my wrists happy. Some folks skip this step entirely and instead place the shredded cabbage mixture little by little in the fermentation vessel, pounding vigorously and sprinkling some of the sea salt as they go. I have found this to be awkward for my body and to take longer (hands on time, as I try to ensure even distribution of the seasonings), and to be generally less enjoyable because of the vigorous pounding which is too jarring for me. Plus, I like getting it all over my hands as I massage it, coaxing out the juices. The choice is yours. Try it a few ways and then stick with the method you prefer. Pounding for 10 minutes should be sufficient, depending on how long your cabbage has been in cold storage. Fresh cabbages have higher water content and will thus produce more liquid more quickly to form the highly desirable brine. I generally massage the mixture (as I am blending the ingredients) for 5-7 minutes or so and then I leave it for 15 -30 minutes so the salt can continue to draw out the fluid from the vegetative matter before proceeding to the next step.
- Tightly pack the cabbage into a one quart mason jar leaving at least 1 inch of space at the top for expansion from the gases that will be escaping and lifting up the contents. I do recommend a small wooden kraut pounder designed for the purpose of getting as much oxygen out of the jar as possible for this step, though I have accomplished this with other, more common kitchen tools before investing in my kraut pounder. Make sure the extracted water covers the vegetables entirely to prevent unwanted microflora from inhabiting your ferment. If there’s not enough liquid, create a brine of 1 ½ teaspoons sea salt to 1 cup pure water and add what is needed to the jar. Do not use chlorinated tap water unless you boil it first, add the sea salt, and then allow it to cool completely. Chlorine is used to kill microbes and we are cultivating microbes in this recipe. Best to use quality drinking water, not municipal water here and for drinking in your daily life.
- Some people prefer to tuck in a piece of cabbage leaf over the top of the mixture at this point, to keep any stray or floating pieces submerged in the brine before loosely sealing the lid. Others press the mixture and keep it under the brine by inserting a clean plate, dish or a lid into the fermentation container. Cover with a clean towel if needed to keep out fruit flies.
- Place the fermentation jar in a warm spot in your kitchen and allow the Sauerkraut to ferment for about 2 -3 weeks. Some folks prefer to place it in cold storage after a minimal time of 7 to 10 days, while others ferment it for as long as 4 weeks.
- Check on it from time to time to be sure that the brine covers the mixture and to remove any harmless white mold that may form on the surface.
- A good way to know when it’s ready is to smell and taste it during the fermentation process (after at least 7 days) and move it to the refrigerator when you’re satisfied with the taste. Be sure not to contaminate your batch when you taste. No double dipping, please!
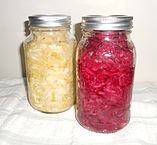
- Your ferment will change color and texture as the bacteria create lactic acid and carbon dioxide and it gets more sour. The flavor improves over time and the sauerkraut will last many months in your refrigerator or cool cellar. Enjoy!
Tips on Eating Sauerkraut:
- I usually have about 2 Tablespoons with my meals, though this may be too much to start out with if you are new to consuming ferments. Stay tuned for some suggestions on how to make this wonderfully beneficial food easier to digest.
- If you love the tangy flavor of sauerkraut (and your teeth are not bothered by eating it alone), it’s also highly beneficial to eat it before your meal – as a tasty way to whet your appetite by itself or as part of an appetizer plate before the main meal. This prepares your digestive system for your meal and is excellent when folks are already feeling challenged with eating foods without pain or discomfort (from heartburn, gas and bloating, abdominal pain or other digestive discomfort).
- The distinctive sour tangy taste of sauerkraut pairs well with proteins and fat. Think of a hearty German sausage or an all American hot dog meal as examples of a great flavor combination.
This post contains AFFILIATE LINKS. Click through for more information.
 recipes
Reader Comments